您的购物车目前是空的!
标签: USRP
-
AI-RAN : SDR X410 配置
Spark 配置
安装Sionna-rk
git clone https://github.com/NVlabs/sionna-rk.git
cd sionna-rk
安装UHD(Orin平台请勿使用)
sudo apt install -y \
    autoconf automake build-essential ccache cmake cpufrequtils \
    doxygen ethtool g++ git inetutils-tools libboost-all-dev \
    libncurses6 libncurses-dev libusb-1.0-0 libusb-1.0-0-dev \
    libusb-dev python3-dev python3-mako python3-numpy python3-requests \
    python3-scipy python3-setuptools python3-ruamel.yaml ninja-build

git clone https://github.com/EttusResearch/uhd.git

cd host
mkdir build && cd build
cmake -DCMAKE_POLICY_DEFAULT_CMD0167=NEW -GNinja ..
ninja
ninja test
sudo ninja install
需要建立Python的索引
cd /usr/lib/python3/dist-packages
sudo vim uhd.pth

/usr/local/lib/python3.12/site-packages
查看GPU信息
nvidia-smiGPU信息显示如下:
Thu Nov 27 19:33:48 2025
+-----------------------------------------------------------------------------------------+
| NVIDIA-SMI 580.95.05              Driver Version: 580.95.05      CUDA Version: 13.0     |
+-----------------------------------------+------------------------+----------------------+
| GPU  Name                 Persistence-M | Bus-Id          Disp.A | Volatile Uncorr. ECC |
| Fan  Temp   Perf          Pwr:Usage/Cap |           Memory-Usage | GPU-Util  Compute M. |
|                                         |                        |               MIG M. |
|=========================================+========================+======================|
|   0  NVIDIA GB10                    On  |   0000000F:01:00.0  On |                  N/A |
| N/A   42C    P0              5W /  N/A  | Not Supported          |      0%      Default |
|                                         |                        |                  N/A |
+-----------------------------------------+------------------------+----------------------+
安装 cupy
pip install cupy-cuda13x --break-system-packages如果要让Spark的网口速率固定为10G,请执行指令
sudo ethtool -s enP2p1s0f0np0 speed 10000 duplex full autoneg off检查速率
sudo ethtool enP2p1s0f0np0 | grep -i speed因为不存在速率自动协商的功能,所以需要手动配置好。
软件无线电 X410 配置
当你第一次拿到软件无线电X410的时候,请按照下图所示的常规的连接方法进行接线。
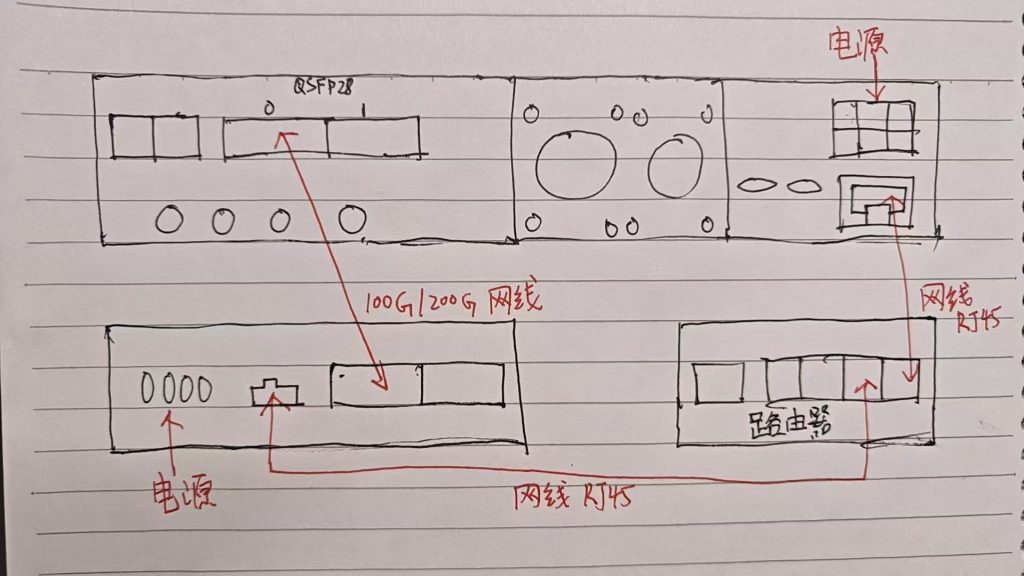
- 将Spark和X410都连接到同一台路由器中。
- X410的QSFP28口1和Spark的网口进行连接,注意正反。
在Spark中启动一下终端,然后在终端中运行
uhd_find_devices会得到如下的输出
airan1@spark-bbdd:~$ uhd_find_devices
[INFO] [UHD] linux; GNU C++ version 13.3.0; Boost_108300; UHD_4.9.0.0-75-g0f522267
--------------------------------------------------
-- UHD Device 0
--------------------------------------------------
Device Address:
    serial: XXXXXXX
    addr: 192.168.0.104
    claimed: False
    fpga: X4_200
    mgmt_addr: 192.168.0.104
    product: x410
    type: x4xx
然后输入指令进入终端
airan1@spark-bbdd:~$ ssh root@192.168.0.104
The authenticity of host '192.168.0.104 (192.168.0.104)' can't be established.
ED25519 key fingerprint is SHA256:tu6m3SUsvFbVQxtLQiGBU/5BuEO3QexkXl4BNUh+Ye0.
This key is not known by any other names.
Are you sure you want to continue connecting (yes/no/[fingerprint])? yes
Warning: Permanently added '192.168.0.104' (XXXXXXX) to the list of known hosts.
进入终端之后,也可以查看设备信息
root@xx-x4xx-XXXXXXX:~# uhd_find_devices
[INFO] [UHD] linux; GNU C++ version 9.2.0; Boost_107100; UHD_4.1.0.7-0-g8f9508f7
--------------------------------------------------
-- UHD Device 0
--------------------------------------------------
Device Address:
    serial: XXXXXXX
    claimed: False
    fpga: X4_200
    mgmt_addr: 127.0.0.1
    product: x410
    type: x4xx
完成之后,可以看到UHD得版本是4.1,可以来下载完整的镜像
root@xx-x4xx-XXXXXXX:~# uhd_images_downloader下载完成之后,可以查看下载好的镜像
root@xx-x4xx-XXXXXXX:~# ls /usr/share/uhd/images/在4.1版本中,是只能看到“X4_200”
为了能在Spark中使用,那么就需要安装和Spark一样的UHD版本。
更新文件系统
root@xx-x4xx-XXXXXXX:~# usrp_update_fs -t master

/usr/lib/python3.7/site-packages/usrp_mpm/rpc_server.py:24: MonkeyPatchWarning: Monkey-patching ssl after ssl has already been imported may lead to errors, including RecursionError on Python 3.6. It may also silently lead to incorrect behaviour on Python 3.7. Please monkey-patch earlier. See https://github.com/gevent/gevent/issues/1016. Modules that had direct imports (NOT patched): ['urllib3.contrib.pyopenssl (/usr/lib/python3.7/site-packages/urllib3/contrib/pyopenssl.py)'].
  monkey.patch_all()
Downloading manifest file from https://raw.githubusercontent.com/EttusResearch/uhd/master/images/manifest.txt...
[INFO] Using base URL: https://files.ettus.com/binaries/cache/
[INFO] Images destination: /usr/share/uhd/images
[INFO] Using manifest file at location: /tmp/tmpsb7jmy6_/manifest.txt
The file size for this target (438.3 MiB) exceeds the download limit (100.0 MiB). Continue downloading? [y/N]y
459548 kB / 459548 kB (100%) x4xx_common_mender_default-v4.9.0.0.zip
[INFO] Images download complete.
INFO[0000] Loaded configuration file: /etc/mender/mender.conf
INFO[0000] Mender running on partition: /dev/mmcblk0p2
INFO[0000] Start updating from local image file: [/usr/share/uhd/images/usrp_x4xx_fs.mender]
Installing Artifact of size 466179072...
INFO[0000] No public key was provided for authenticating the artifact
INFO[0000] Update Module path "/usr/share/mender/modules/v3" could not be opened (open /usr/share/mender/modules/v3: no such file or directory). Update modules will not be available
INFO[0000] Opening device "/dev/mmcblk0p3" for writing
INFO[0000] Native sector size of block device /dev/mmcblk0p3 is 512 bytes. Mender will write in chunks of 1048576 bytes
................................   0% 1024 KiB
................................   0% 2048 KiB
................................   0% 3072 KiB
................................   0% 4096 KiB
................................   1% 5120 KiB
................................   1% 6144 KiB
................................   1% 7168 KiB
................................   1% 8192 KiB
................................   2% 9216 KiB
................................   X
................................   X
................................  97% 444416 KiB
................................  97% 445440 KiB
................................  98% 446464 KiB
................................  98% 447488 KiB
................................  98% 448512 KiB
................................  98% 449536 KiB
................................  98% 450560 KiB
................................  99% 451584 KiB
................................  99% 452608 KiB
................................  99% 453632 KiB
................................  99% 454656 KiB
..................INFO[0153] All bytes were successfully written to the new partition
INFO[0153] The optimized block-device writer wrote a total of 3769 frames, where 1516 frames did need to be rewritten (i.e., skipped)
INFO[0155] Wrote 3951034368/3951034368 bytes to the inactive partition
               100% 455253 KiB
INFO[0155] Enabling partition with new image installed to be a boot candidate: 3
Use -commit to update, or -rollback to roll back the update.
At least one payload requested a reboot of the device it updated.
Applied image. After reboot, check if everything works, and then run the command '$ mender -commit' to confirm (otherwise, this update will be undone).
Note: Any data stored in this partition will be not accessible after reboot.
Reboot now? [Yn] y
Will reboot now. Hit Ctrl-C before the countdown expires to cancel.
Rebooting in 3...
2...
1...
Connection to 192.168.0.104 closed by remote host.
Connection to 192.168.0.104 closed.
也可以指定UHD版本
usrp_update_fs -t v4.7.0.0清除ssh的垃圾信息
ssh-keygen -f '/home/airan1/.ssh/known_hosts' -R '192.168.0.104'重新ssh登陆X410
root@xx-x4xx-XXXXXXX:~# uhd_find_devices
[INFO] [UHD] linux; GNU C++ version 11.5.0; Boost_107800; UHD_4.9.0.0-0-g006d7f76
--------------------------------------------------
-- UHD Device 0
--------------------------------------------------
Device Address:
    serial: XXXXXXX
    claimed: False
    fpga: X4_200
    mgmt_addr: 127.0.0.1
    name: xx-x4xx-XXXXXXX
    product: x410
    type: x4xx
查看对应的固件信息
root@xx-x4xx-XXXXXXX:~# ls /usr/share/uhd/images/
inventory.json		       usrp_x410_fpga_UC_200.dts.md5   usrp_x440_fpga_CG_1600.dts      usrp_x440_fpga_X4_1600.bit.md5  usrp_x440_fpga_X4_400.bit
usrp_x410_fpga_CG_400.bit      usrp_x410_fpga_UC_200.rpt       usrp_x440_fpga_CG_1600.dts.md5  usrp_x440_fpga_X4_1600.dts      usrp_x440_fpga_X4_400.bit.md5
usrp_x410_fpga_CG_400.bit.md5  usrp_x410_fpga_X4_200.bit       usrp_x440_fpga_CG_1600.rpt      usrp_x440_fpga_X4_1600.dts.md5  usrp_x440_fpga_X4_400.dts
usrp_x410_fpga_CG_400.dts      usrp_x410_fpga_X4_200.bit.md5   usrp_x440_fpga_CG_400.bit       usrp_x440_fpga_X4_1600.rpt      usrp_x440_fpga_X4_400.dts.md5
usrp_x410_fpga_CG_400.dts.md5  usrp_x410_fpga_X4_200.dts       usrp_x440_fpga_CG_400.bit.md5   usrp_x440_fpga_X4_200.bit       usrp_x440_fpga_X4_400.rpt
usrp_x410_fpga_CG_400.rpt      usrp_x410_fpga_X4_200.dts.md5   usrp_x440_fpga_CG_400.dts       usrp_x440_fpga_X4_200.bit.md5
usrp_x410_fpga_UC_200.bit      usrp_x410_fpga_X4_200.rpt       usrp_x440_fpga_CG_400.dts.md5   usrp_x440_fpga_X4_200.dts
usrp_x410_fpga_UC_200.bit.md5  usrp_x440_fpga_CG_1600.bit      usrp_x440_fpga_CG_400.rpt       usrp_x440_fpga_X4_200.dts.md5
usrp_x410_fpga_UC_200.dts      usrp_x440_fpga_CG_1600.bit.md5  usrp_x440_fpga_X4_1600.bit      usrp_x440_fpga_X4_200.rpt
固件类型
FPGA Image Flavor Number of
ChannelsBandwidth
per ChannelQSFP28 Port 0 Interface QSFP28 Port 1 Interface DDC/DUC DRAM X4_200 4 (2 per ZBX) 200 MHz 4x 10 GbE (All Lanes) Unused Yes Yes (4 GiB, 4-Ch Replay) UC_200 4 (2 per ZBX) 200 MHz Unused 100 GbE Yes Yes (4 GiB, 4-Ch Replay) CG_400 4 (2 per ZBX) 400 MHz 100 GbE 100 GbE No No 烧写支持100G的固件
root@xx-x4xx-XXXXXXX:~# uhd_image_loader --args "type=x4xx,mgmt_addr=127.0.0.1,fpga=CG_400"

[INFO] [UHD] linux; GNU C++ version 11.5.0; Boost_107800; UHD_4.9.0.0-0-g006d7f76
[INFO] [MPMD] Initializing 1 device(s) in parallel with args: mgmt_addr=127.0.0.1,type=x4xx,product=x410,serial=XXXXXXX,name=xx-x4xx-XXXXXXX,fpga=X4_200,claimed=False,skip_init=1
[INFO] [MPM.main] Launching USRP/MPM, version: 4.9.0.0-g006d7f76
[INFO] [MPM.main] Spawning RPC process...
[INFO] [MPM.PeriphManager] Device serial number: XXXXXXX
[INFO] [MPM.PeriphManager.ClkMgr] Using Clock Configuration:
DB0: Master Clock Rate: 245.76 MSps @Converter Rate 2.94912 GHz
DB1: Master Clock Rate: 245.76 MSps @Converter Rate 2.94912 GHz
[INFO] [MPM.PeriphManager] Initialized 2 daughterboard(s).
[INFO] [MPM.PeriphManager] init() called with device args `boot_init=True,clock_source=internal,time_source=internal,initializing=True'.
[INFO] [MPM.RPCServer] RPC server ready!
[INFO] [MPM.RPCServer] Spawning watchdog task...
[INFO] [MPMD] Claimed device without full initialization.
[INFO] [MPMD IMAGE LOADER] Starting update. This may take a while.
[INFO] [MPM.PeriphManager] Installing component `fpga'
[INFO] [MPM.PeriphManager] Installing component `dts'
[INFO] [MPM.RPCServer] Resetting peripheral manager.
[INFO] [MPM.PeriphManager] Device serial number: XXXXXXX
[INFO] [MPM.PeriphManager.ClkMgr] Using Clock Configuration:
DB0: Master Clock Rate: 491.52 MSps @Converter Rate 2.94912 GHz
DB1: Master Clock Rate: 491.52 MSps @Converter Rate 2.94912 GHz
[INFO] [MPM.PeriphManager] Initialized 2 daughterboard(s).
[INFO] [MPM.PeriphManager] init() called with device args `boot_init=True,clock_source=internal,time_source=internal,initializing=True'.
[INFO] [MPMD IMAGE LOADER] Update component function succeeded.
[INFO] [MPMD] Initializing 1 device(s) in parallel with args: mgmt_addr=127.0.0.1,type=x4xx,product=x410,serial=XXXXXXX,name=xx-x4xx-XXXXXXX,fpga=CG_400,claimed=False,find_all=1
[INFO] [MPM.PeriphManager] init() called with device args `find_all=1,fpga=CG_400,mgmt_addr=127.0.0.1,name=xx-x4xx-XXXXXXX,product=x410,clock_source=internal,time_source=internal,initializing=True'.
[INFO] [0/Radio#0] Clocking reconfigured, running ADC Self Cal on DB0...
[INFO] [0/Radio#0] Calibrating channel 0...
[INFO] [0/Radio#0] Calibrating channel 1...
[INFO] [0/Radio#0] Calibrated 2 channels.
[INFO] [0/Radio#1] Clocking reconfigured, running ADC Self Cal on DB1...
[INFO] [0/Radio#1] Calibrating channel 2...
[INFO] [0/Radio#1] Calibrating channel 3...
[INFO] [0/Radio#1] Calibrated 2 channels.
再次查看固件的版本
root@xx-x4xx-XXXXXXX:~# uhd_find_devices
[INFO] [UHD] linux; GNU C++ version 11.5.0; Boost_107800; UHD_4.9.0.0-0-g006d7f76
--------------------------------------------------
-- UHD Device 0
--------------------------------------------------
Device Address:
    serial: XXXXXXX
    claimed: False
    fpga: CG_400
    mgmt_addr: 127.0.0.1
    name: xx-x4xx-XXXXXXX
    product: x410
    type: x4xx
重启之后,是需要确认固件的,请执行该指令
root@xx-x4xx-XXXXXXX:~# mender commit
INFO[0000] Loaded configuration file: /etc/mender/mender.conf
INFO[0000] 'UpdateControlMapExpirationTimeSeconds' is not set in the Mender configuration file. Falling back to the default of 2*UpdatePollIntervalSeconds
INFO[0000] 'UpdateControlMapBootExpirationTimeSeconds' is not set in the Mender configuration file. Falling back to the default of 600 seconds
INFO[0000] Mender running on partition: /dev/mmcblk0p3
Committing Artifact...
INFO[0000] Executing script: ArtifactCommit_Enter_10_migrate-configuration
INFO[0000] Committing update
在Spark中可以开启100G网口通道
配置100G网口的IP地址
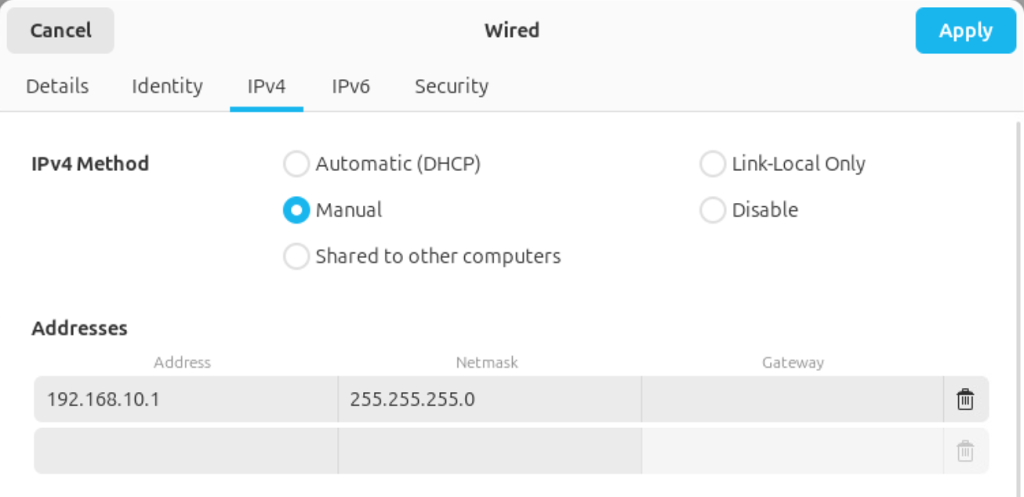
注意IP地址:
Interface Name Description Default Configuration Configuration File X4_xxx FPGA image CG_xxx FPGA image eth0RJ45 DHCP eth0.network DHCP DHCP int0Internal 169.254.0.1/24 int0.network 169.254.0.1/24 169.254.0.1/24 sfp0QSFP28 0 (4-lane interface or lane 0) 192.168.10.2/24 sfp0.network 192.168.10.2/24 192.168.10.2/24 sfp0_1QSFP28 0 (lane 1) 192.168.11.2/24 sfp0_1.network 192.168.11.2/24 N/A sfp0_2QSFP28 0 (lane 2) 192.168.12.2/24 sfp0_2.network 192.168.12.2/24 N/A sfp0_3QSFP28 0 (lane 3) 192.168.13.2/24 sfp0_3.network 192.168.13.2/24 N/A sfp1QSFP28 1 (4-lane interface or lane 0) 192.168.20.2/24 sfp1.network N/C 192.168.20.2/24 sfp1_1QSFP28 1 (lane 1) 192.168.21.2/24 sfp1_1.network N/C N/A sfp1_2QSFP28 1 (lane 2) 192.168.22.2/24 sfp1_2.network N/C N/A sfp1_3QSFP28 1 (lane 3) 192.168.23.2/24 sfp1_3.network N/C N/A 切换到Spark中,在Spark的终端中运行
airan1@spark-bbdd:~$ uhd_find_devices
[INFO] [UHD] linux; GNU C++ version 13.3.0; Boost_108300; UHD_4.9.0.0-75-g0f522267
--------------------------------------------------
-- UHD Device 0
--------------------------------------------------
Device Address:
    serial: XXXXXXX
    addr: 192.168.10.2
    claimed: False
    fpga: CG_400
    mgmt_addr: 192.168.0.104
    mgmt_addr: 192.168.10.2
    name: xx-x4xx-XXXXXXX
    product: x410
    type: x4xx
在输出中是可以看到已经显示出100G网口的IP信息了。
安装一下Gnuradio
sudo apt install gnuradio运行基础的频谱软件
uhd_fft -f 2450M -s 500M运行在cpu的软件,会存在一些丢包情况,不够连续。
系统配置
方法一,修改缓冲区的大小
sudo sysctl -w net.core.rmem_max=250000000
sudo sysctl -w net.core.wmem_max=250000000
查看修改之后的数值
sysctl net.core.rmem_max
sysctl net.core.wmem_max
方法二,持久化该配置
sudo nano /etc/sysctl.d/uhd.conf写入如下的内容
net.core.rmem_max = 250000000
net.core.wmem_max = 250000000
保存后执行:
sudo sysctl --system开启SCTP内核
sudo modprobe sctp
lsmod | grep sctp

echo sctp | sudo tee /etc/modules-load.d/sctp.conf
Docker增加信息
# Add Docker's official GPG key:
sudo install -m 0755 -d /etc/apt/keyrings
sudo curl -fsSL https://download.docker.com/linux/ubuntu/gpg -o /etc/apt/keyrings/docker.asc
sudo chmod a+r /etc/apt/keyrings/docker.asc

# Add the repository to Apt sources:
echo \
  "deb [arch=$(dpkg --print-architecture) signed-by=/etc/apt/keyrings/docker.asc] https://download.docker.com/linux/ubuntu \
  $(. /etc/os-release && echo "${UBUNTU_CODENAME:-$VERSION_CODENAME}") stable" | \
  sudo tee /etc/apt/sources.list.d/docker.list > /dev/null

sudo nvidia-ctk runtime configure --runtime=docker
sudo systemctl restart docker

sudo usermod -aG docker $USER
加载镜像
docker load -i oai-amf-v2.1.0-1.2.tar
docker load -i oai-ausf-v2.1.0-1.2.tar
docker load -i oai-gnb-cuda.tar
docker load -i oai-lmf-v2.1.0-1.2.tar
docker load -i oai-nrf-v2.1.0-1.2.tar
docker load -i oai-nr-ue-cuda.tar
docker load -i oai-nssf-v2.1.0-1.2.tar
docker load -i oai-smf-v2.1.0-1.2.tar
docker load -i oai-udm-v2.1.0-1.2.tar
docker load -i oai-udr-v2.1.0-1.2.tar
docker load -i oai-upf-v2.1.0-1.2.tar
docker load -i ran-base-cuda.tar
docker load -i ran-build-cuda.tar
docker load -i trf-gen-cn5g.tar
docker load -i mysql-8-0.tar
Python API使用
创建USRP对象
import uhd
# X310、X410、Nxx系列单台设备
usrp = uhd.usrp.MultiUSRP("addr=192.168.10.2")
# X310、X410、Nxx系列多台设备
usrp = uhd.usrp.MultiUSRP("addr=192.168.10.2,addr=192.168.10.3")
# B210系列单台和多台
usrp = uhd.usrp.MultiUSRP("serial=XXXXXX1,serial=XXXXXX2")
配置参考时钟(10 MHz 和 PPS)
usrp.set_clock_source("external")
usrp.set_time_source("external")
或者
usrp.set_clock_source("gpsdo")
usrp.set_time_source("gpsdo")
接收信号
samps = usrp.recv_num_samps( 1e6, # Number of samples 2.4e9, # Frequency in Hz 1e6, # Sampling rate [0], # Receive on channel 0 80, # 80 dB of RX gain ) -
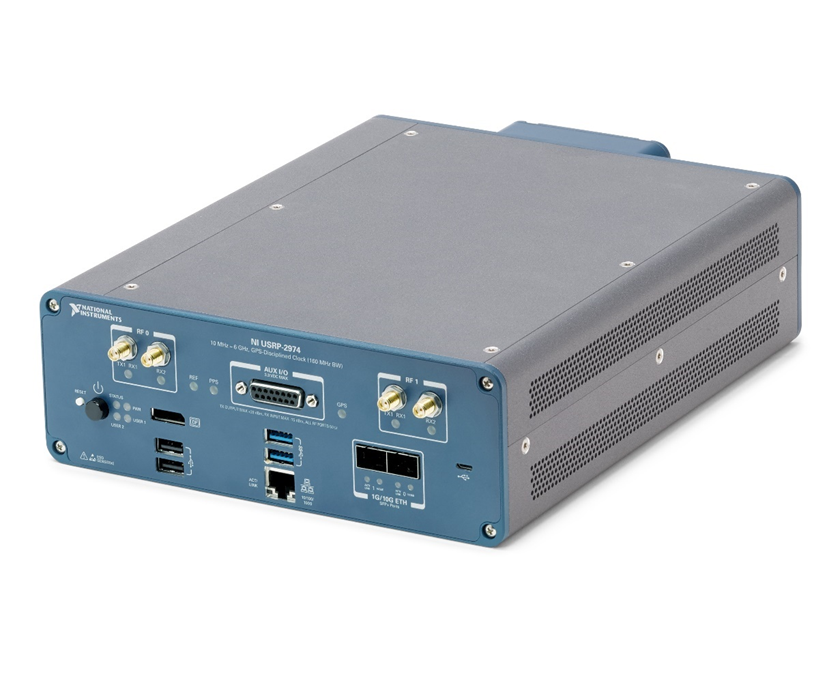
使用指南:NI-2974
一、硬件说明
1.1、系统图
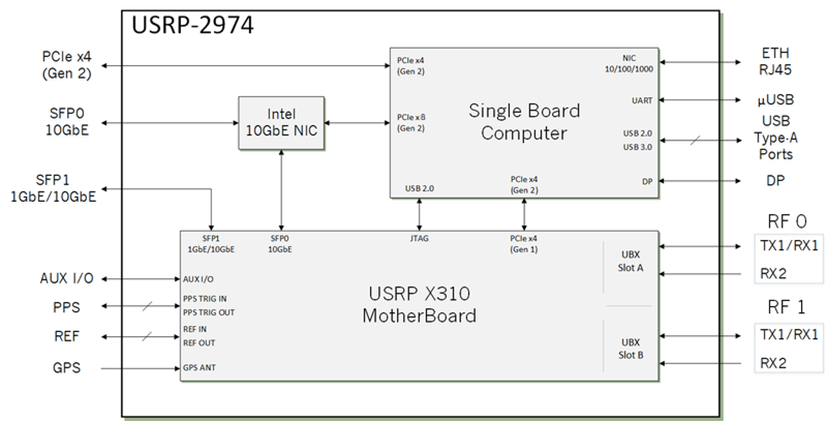
系统图 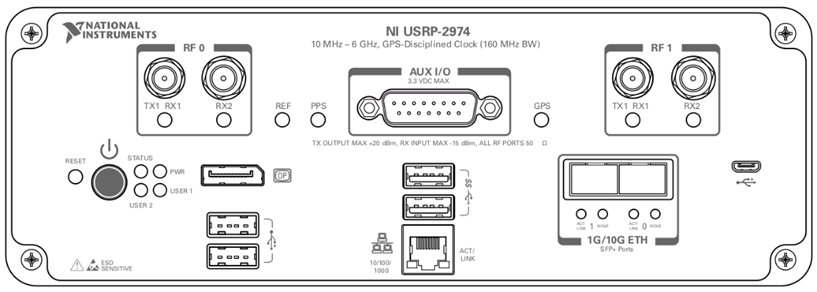
连接器 使用 RF 0、RF 1 射频信号的输入输出端。 TX1 RX1 为SMA(阴头)连接器,阻抗为50 Ω,为单端输入或输出通道。 射频信号输入端。 RX2为SMA(f)连接器,阻抗为50Ω,为单端输入通道。 AUX I/O 通用 I/O (GPIO) 端口。 AUX I/O 由 FPGA 控制。 DP DisplayPort 连接器,用于为您的控制器连接一台显示器。 USB2.0 USB 端口,支持常见的 USB 外围设备,例如闪存驱动器、硬盘驱动器、键盘和鼠标。 USB3.0 USB 端口,支持常见的 USB 外围设备,例如闪存驱动器、硬盘驱动器、键盘和鼠标。 1G ETH RJ45 端口用于与其他以太网设备的 1G ETH 连接。 μUSB USB 端口用于 UART 连接到控制器。 1G/10G ETH 0 SFP+ 端口用于与其他以太网设备的 10G ETH 连接。 连接到嵌入式 Linux 计算机以与 LabVIEW RT 通信。 1G/10G ETH 1 SFP+ 端口用于与其他以太网设备的 1G/10G ETH 连接。 连接到 FPGA。 目前在 LabVIEW Communications System Design Suite 中不受支持。 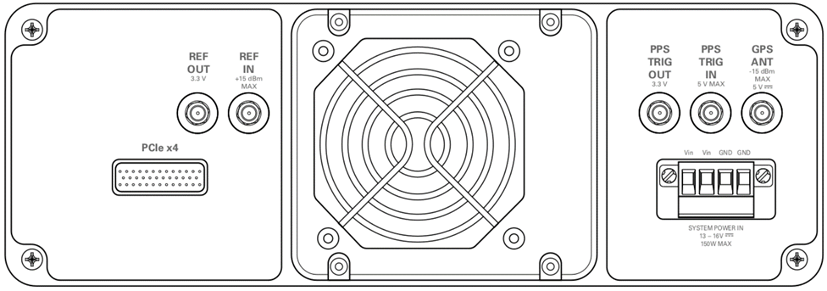
连接器 使用 REF OUT 设备上 LO 的外部参考信号的输出端。 REF OUT 是一个阻抗为 50 Ω 的 SMA (f) 连接器,它是一个单端参考输出。 此连接器的输出信号在 3.3 V 时为 10 MHz。 REF IN 设备上 LO 的外部参考信号的输入端。 REF IN 是一个阻抗为 50 Ω 的 SMA (f) 连接器,它是一个单端参考输入。 REF IN 接受最小输入功率为 0 dBm (0.632 Vpk-pk) 和最大输入功率为 15 dBm (3.56 Vpk-pk) 的方波或正弦波 10 MHz 信号。 PPS TRIG OUT PPS 定时参考的输出端。 PPS TRIG OUT 是 SMA (f) 连接器,阻抗为 50 Ω,是单端输入。 输出信号为 0 V 至 3.3 V TTL。 您还可以将此端口用作您使用 PPS Trig Out I/O 信号编程的触发输出 (TRIG OUT)。 PPS TRIG IN PPS 时序参考输入端。 PPS TRIG IN 是一个 SMA (f) 连接器,阻抗为 50 Ω,是一个单端输入通道。 PPS TRIG IN 接受 0 V 至 3.3 V TTL 和 0 V 至 5 V TTL 信号。 您也可以将此端口用作您使用 NI-USRP 软件控制的触发输入 (TRIG IN)。 GPS ANT GPS天线信号输入端。 GPS ANT 是一种 SMA (f) 连接器,最大输入功率为 -15 dBm,输出为 DC 5 V,可为有源天线供电。 注意:如果不使用 GPS ANT 端口,请不要关闭它。 PCIe x4 用于通过 MXI Express 四通道电缆连接 PCI Express 第 2 代 x4 总线的端口。 可用于连接外部 USRP 设备或外部机箱。 SYSTEM POWER IN 接受 15 V ± 5%、10 A 外部直流电源连接器的输入。 1.2、SFP网口说明
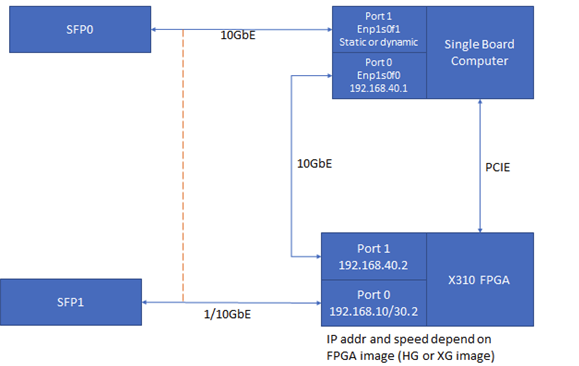
NI USRP-2974是一张单板计算机(SBC)集成了一台X310(UBX-160+GPSDO),提供了两个SFP+ 端口用于数据的传输。
Location Port IP Address Interface Type X310 Port 0 192.168.10.2 1GbE (HG Image) X310 Port 0 192.168.30.2 10GbE (XG Image) X310 Port 1 192.168.40.2 10GbE (HG or XG Image) SBC Port 0 Manually set to 192.168.40.1 10GbE SBC Port 1 Static or Dynamic (User Configurable) 10GbE 参考文献:https://knowledge.ni.com/KnowledgeArticleDetails?id=kA03q000001DsV3CAK&l=zh-CN
二、安装操作系统
2.1、安装Windows10操作系统
1、制作Windows启动盘
2、选择你的U盘作为启动项

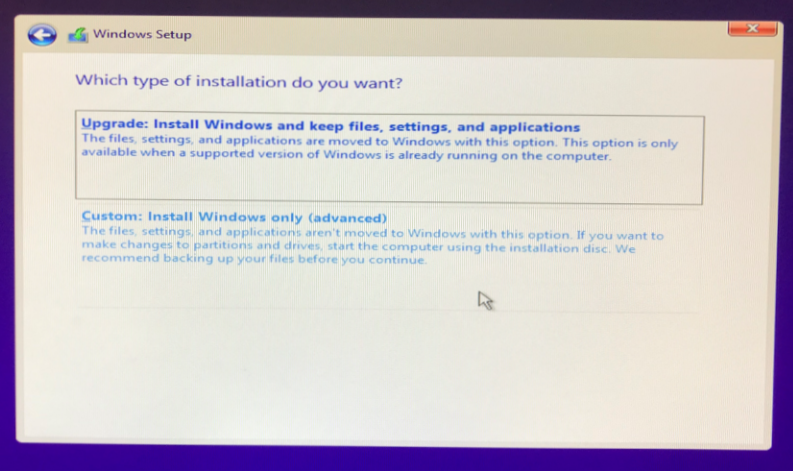
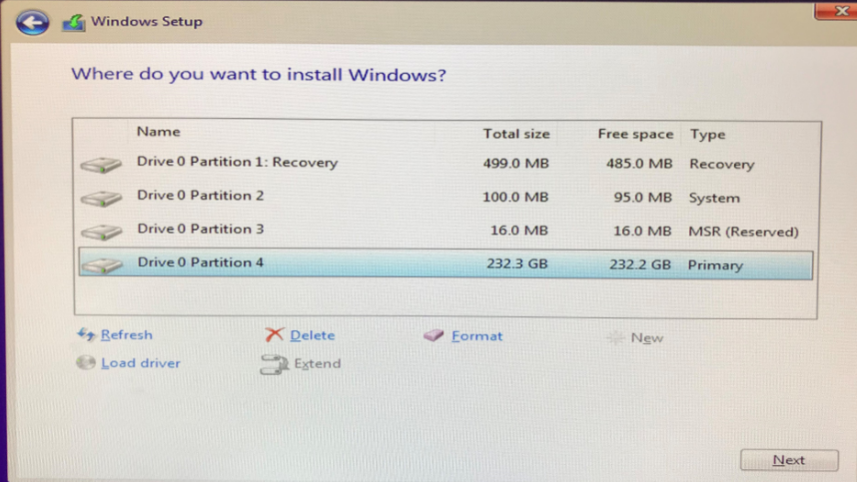
删除掉所有的分区,然后进行安装。
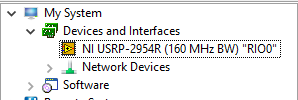
当系统安装完成之后,请继续安装LabVIEW、NI USRP等工具包。安装完成之后,在NI MAX中会显示如下的图标
参考连接:https://knowledge.ni.com/KnowledgeArticleDetails?id=kA03q000000YHnICAW&l=zh-CN
2.2、安装Linux Real-Time
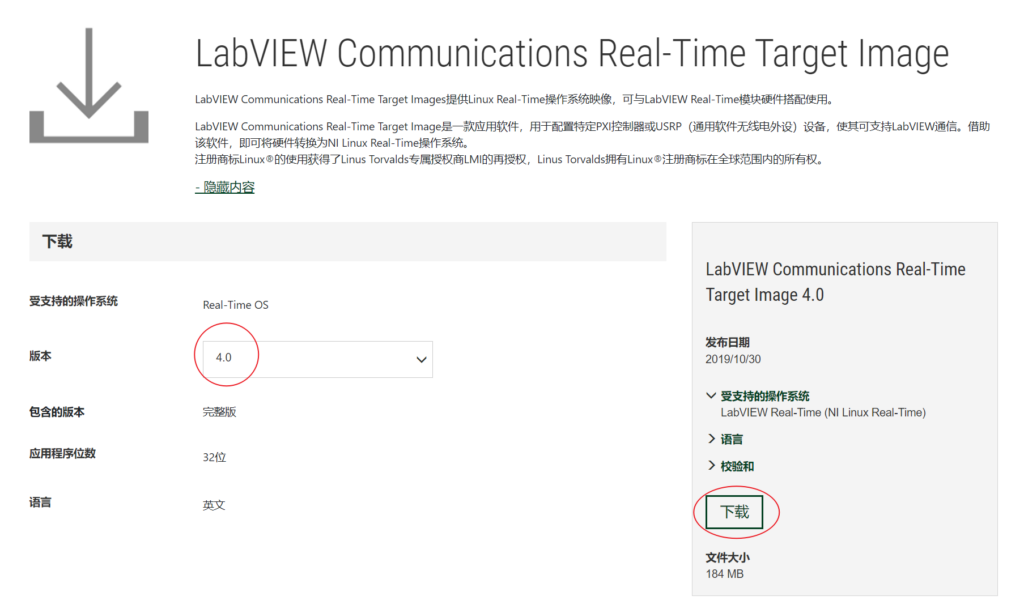
1、下载USRP-2974的系统镜像,LabVIEW Communications Real-Time Target Image
2、使用Putty,制作系统盘。当然你也可以选择其他的工具,这里以Putty为例。
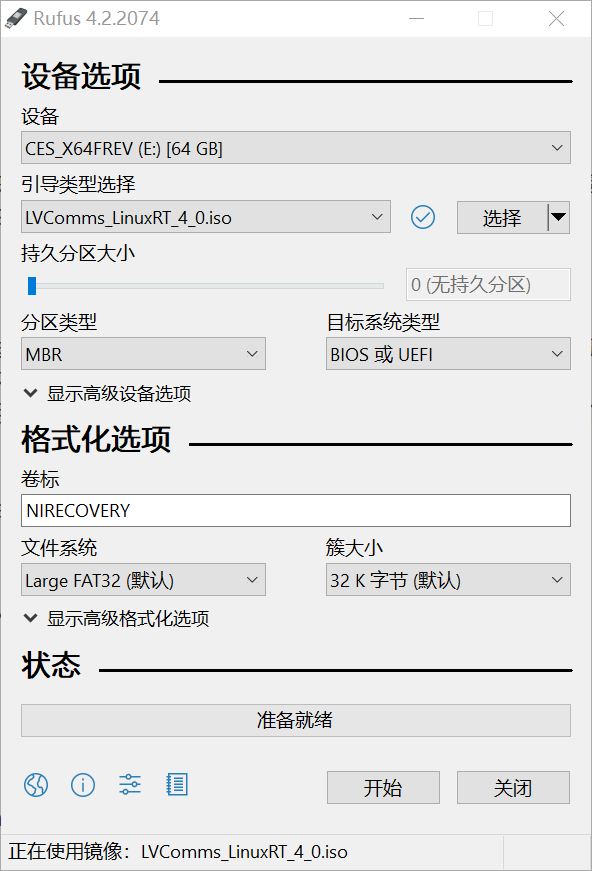
3、单击开始。出现提示时,选择 “以 ISO 映像模式写入”,然后单击“确定”。
4、等待格式化和配置完成。
5、单击“关闭”并从计算机中安全弹出 USB 闪存盘。
6、准备好启动盘之后,将USB启动盘插入USRP-2974,同时插入键盘和鼠标,注意需要是有线的。
7、将USRP-2974断电,然后再重新上电,连续按键盘上的 F10 键,直到启动进入启动选项菜单。
8、在UEFI列表中,选择插入的U盘,按Enter 键从 USB 闪存盘引导。
9、等待 NI Linux Real-Time 加载。按照说明进行安装。
10、出现提示时,移除 USB 驱动器,然后按照屏幕提示重新启动USRP。
11、系统将重新启动并进入 NI Linux RT 运行模式。
12、LabVIEW Communications System Designer 现在可以检测您的系统。
13、实时系统默认用户名为root,密码为空。
参考连接:https://www.ni.com/en/support/documentation/supplemental/18/provisioning-a-real-time-controller-or-usrp-stand-alone-device-f.html
三、开箱检查
3.1、硬件检查
3.1.1、设备自带的:
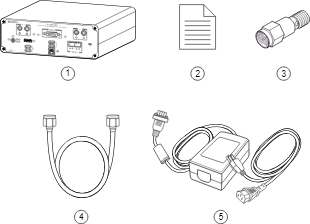
包含的硬件有:
1、USRP-2974,
2、纸质文档,
3、30dB衰减器,
4、SMA馈线,
5、电源适配器与电源线。
注意:为什么附件中配置了30dB衰减器,是非常有必要的,如果您直接将信号发生器连接或通过电缆连接到设备,或者将多个设备连接在一起,则必须将30 dB衰减器连接到每个接收USRP-2974的 RF 输入(RX1 或 RX2)。
3.1.2、需要自己准备的
除此之外,你需要自己准备一根千兆网网线,用于与设备的互联。
3.1.3、升级使用的
外置主机需要购买:万兆网卡、万兆光缆,可以参考 http://www.fansen.cc/2023/06/16/usrp-10g-net-use-manual/
和USRP的ETH1连接即可。USRP的固件用XG,可以用刷固件指令进行安装不同版本得固件。
uhd_image_loader –args=”type=x300,addr=192.168.30.2,fpga=XG”

3.2、软件安装
使用USRP-2974是需要在台式机安装NI的软件的,安装好之后,就可以正常使用了。软件的安装顺序需要匹配上,不能打乱顺序。
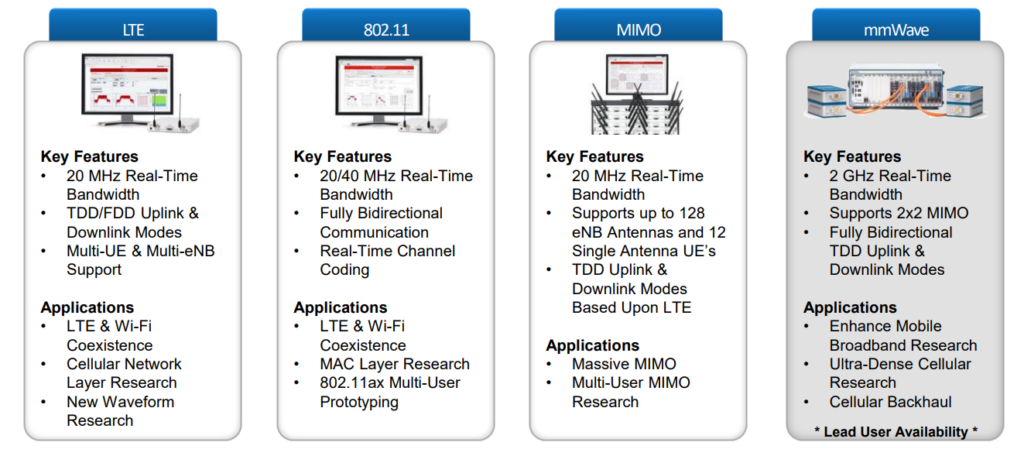
- LabVIEW 64位和32位 2019版本
- LabVIEW Communications 4.0
- Modulation Toolkit 2019
- NI USRP Toolkit 2019
- LVComms80211v1950
- LVCommsLTEv1950
- LVCommsMIMOv1950
四、上手使用
4.1、连接到计算机
对计算机的要求:可以是笔记本或者台式机,都可以进行开发。
计算机和设备的互联一共有两种方式:
- 将USRP-2974前面板的RJ45连接器连接到计算机的以太网端口。
- 将USRP-2974前面板的SFP+端口0连接器连接到计算机的以太网端口。
- 如果您有多台USRP-2974,可以将这些设备全部接入交换机中,计算机也接入其中;
设备上电:将电源连接至USRP-2974即可。
4.2、设备编程使用
需要注意的是,该设备的使用需要在LabVIEW Communications System Design Suite 中进行开发;如果你需要使用LabVIEW 进行编程,则是另外的一种方式,后文将会介绍这种方法。
1、首先你需要打开:LabVIEW Communications System Design Suite 4.0

2、在Projects中,创建示例项目:USRP-2974 Single-Device Streaming
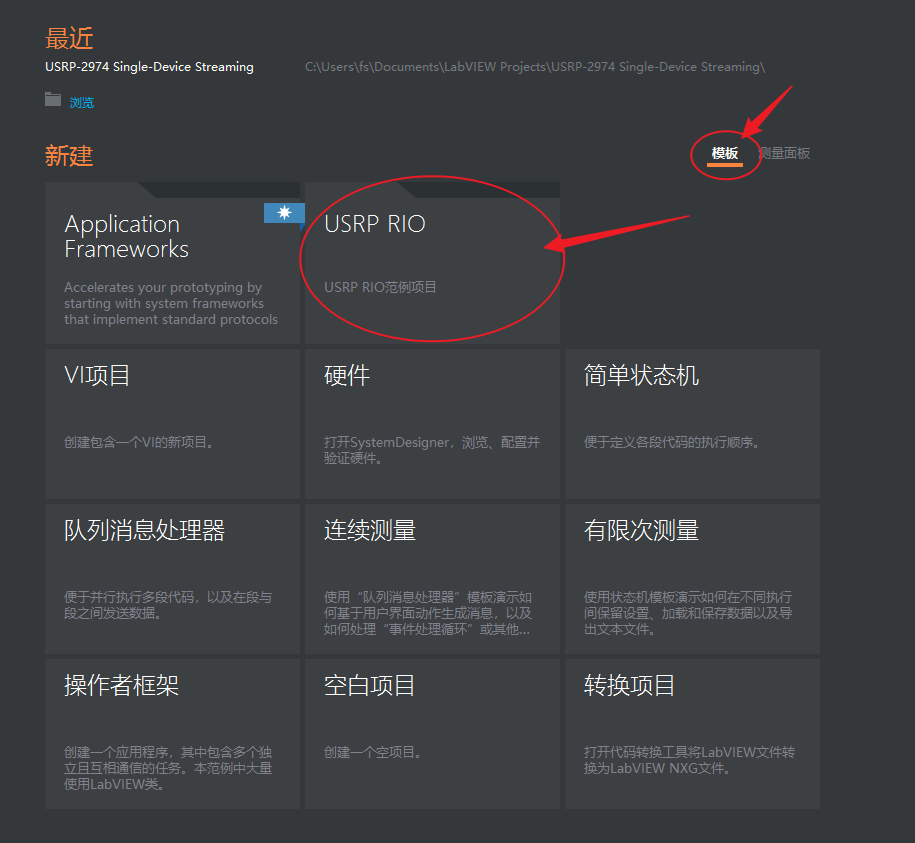
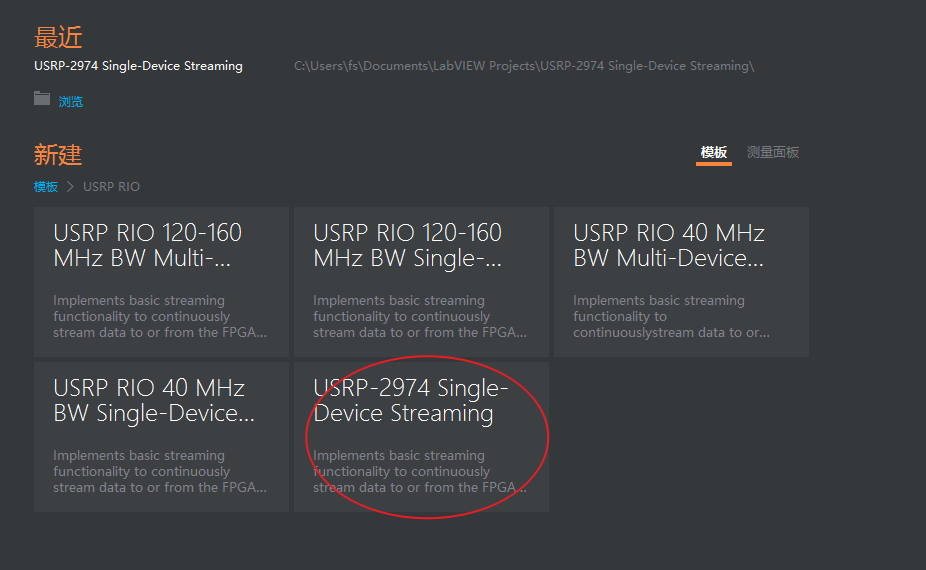
3、添加USRP设备到项目中。找到SystemDesigner ,然后添加设备:
PC » Devices » Software Defined Radio » USRP RIO » NI USRP-2974设备的路径
将设备添加完成之后,请完成配置。
4、运行:Tx and Rx Streaming (Host).gvi
5、点击:Stop,完成测试。
4.3、LTE、802.11、MIMO框架介绍
五、运行LTE框架